


You must be logged into post a comment.
Devin's Tech Blog
A technology blog with How-To and Informational posts.

Mailserver: Configuring Filters – Part 5
Welcome to Part 5 of the Mailserver Configuration series in which we will cover Mail Filters. We will be using SpamAssassin to protect our users from Spam, and ClamAV to protect them from Viruses.
I feel like I should mention this right away: These Filters will NOT stop everything, they just help reduce the amount of spam and viruses the users will receive.
If you haven’t seen the previous parts of the mailserver series, you can find an Index of the sections at the end of this post or on Part 1 of the series. A lot of this series has been fairly backward-compatible with CentOS 6, however there are some significant differences in the configuration of the filters between CentOS 7 and CentOS 6.
Configure Repositories
There are 3 packages that we need to install to configure the filters on our mailserver. The first one being Amavis which is like the manager that scans the emails using the “tools” we configure. ClamAV and SpamAssassin are the “tools” that it will use. To get these three packages we need to add the EPEL (Extra Packages for Enterprise Linux) repository to the server. For CentOS 7 you can use the following commands:
(If for some reason you are following this guide with CentOS 6 and this doesn’t work you can find instructions to add the repo here.)
yum install epel-release
You can verify it was installed successfully by running:
yum repolist
Installing Filters
To install Amavis you need to run the following command:
yum install amavisd-new
This will automatically install Spamassassin but not ClamAV use the following to install ClamAV:
yum install clamav clamav-server clamav-server-systemd
Configuration
Now we should have everything we need to setup filters on our mailserver. SpamAssassin doesn’t require any configuration, Amavis takes care of that by default. We just need to configure Amavis and ClamAV.
Amavis
Before Amavis can start scanning emails, it needs to be told what tools are available to it. To define the “tools” we edit “/etc/amavisd/amavisd.conf”:
nano /etc/amavisd/amavisd.conf
The first thing we need to do is verify that Virus and Spam filtering is not disabled. Toward the top of the configuration file, you will see three lines under “Commonly Adjusted Settings:”. They should be commented out be default, this is good. Specifically make sure that @bypass_virus_checks_maps and @bypass_spam_checks_maps are both commented out or else Amavis wont even try to scan your emails. After verifying those lines, move on to find the $mydomain line. Set that to the appropriate domain.tld for your server.
$mydomain = 'domain.com';
If you want to receive notifications when spam is detected, you should find and set the following lines: (they are set to undefined by default)
$virus_admin = "postmaster\@$mydomain"; # notifications recip.


$mailfrom_notify_admin = "postmaster\@$mydomain"; # notifications sender


$mailfrom_notify_recip = "postmaster\@$mydomain"; # notifications sender


$mailfrom_notify_spamadmin = "postmaster\@$mydomain"; # notifications sender
Now find the http://www.clamav.net/ section and verify that it is not commented out, it should look like this:
 ### http://www.clamav.net/


 ['ClamAV-clamd',


 \&ask_daemon, ["CONTSCAN {}\n", "/var/run/clamd.amavisd/clamd.sock"],


 qr/\bOK$/m, qr/\bFOUND$/m,


 qr/^.*?: (?!Infected Archive)(.*) FOUND$/m ],


 # NOTE: run clamd under the same user as amavisd - or run it under its own


 # uid such as clamav, add user clamav to the amavis group, and then add


 # AllowSupplementaryGroups to clamd.conf;


 # NOTE: match socket name (LocalSocket) in clamav.conf to the socket name in


 # this entry; when running chrooted one may prefer a socket under $MYHOME.
It is important that you pay attention to the “/var/run/clamd.amavisd/clamd.sock” portion. This is the socket where Amavis is going to look for ClamAV. To verify that ClamAV is configured to run using that socket use this command:
cat /etc/clamd.d/amavisd.conf | grep LocalSocket
The path after “Local Socket” should match the path in “/etc/amavisd/amavisd.conf” if it doesn’t, adjust the path in amavisd.conf. This should complete the ClamAV configuration, Amavis takes care of the rest provided it can access the socket.
ClamAV
First were going to copy a configuration template for ClamAV and edit it to work with how we just configured Amavis:
cp /usr/share/doc/clamav-server*/clamd.sysconfig /etc/sysconfig/clamd.amavisd


nano /etc/sysconfig/clamd.amavisd
Modify the file to match this:
CLAMD_CONFIGFILE=/etc/clamd.d/amavisd.conf


CLAMD_SOCKET=/var/run/clamd.amavisd/clamd.sock


#CLAMD_OPTIONS=
Set the ownership on “/var/run/clamd.amavisd”:
chown -R amavis:amavis /var/run/clamd.amavisd
Open the service file:
nano /usr/lib/systemd/system/clamd\@.service
Finally add the following to “/usr/lib/systemd/system/[email protected]”
[Install]


WantedBy=multi-user.target
Now reload the daemons, start ClamAV, and set it to start at boot time.
systemctl daemon-reload


systemctl start clamd@amavisd


systemctl enable clamd@amavisd
Make Postfix use Amavis
At this point Amavis should be configured and ready to start scanning emails, we haven’t started the service yet but we will get to that. Now lets configure Postfix to send messages over to Amavis for scanning. To give you a rough idea of how this works; an email will come into Postifx, Postfix will transfer it to Amavis for scanning, and then Amavis sends the message back to Postfix where it continues along its path. We need to edit master.cf to make Postfix send messages to Amavis:
nano /etc/postfix/master.cf
Add the following lines to the end of the file to tell Postfix to give the mail to Amavis for scanning:
# Send mail to amavis to get scanned, maxproc corresponds to $max_servers in amavisd.conf


amavisfeed unix - - n - 2 lmtp


  -o lmtp_data_done_timeout=1200


  -o lmtp_send_xforward_command=yes
Now the email has left Postfix, and Amavis scans it but we need a way to get the email back into Postfix, so we add another SMTP daemon that only Amavis can use, and lets run it on another port like: 10025. We don’t want anyone else to be able to use this SMTP server though, so we will restrict it to only accept mail from the local host. Add the following lines to the end of master.cf to make Postfix accept the mail back from Amavis:
# Additional SMTP daemon for Amavis:


127.0.0.1:10025 inet n - n - - smtpd


  -o content_filter=


  -o smtpd_delay_reject=no


  -o smtpd_client_restrictions=permit_mynetworks,reject


  -o smtpd_helo_restrictions=


  -o smtpd_sender_restrictions=


  -o smtpd_recipient_restrictions=permit_mynetworks,reject


  -o smtpd_data_restrictions=reject_unauth_pipelining


  -o smtpd_end_of_data_restrictions=


  -o smtpd_restriction_classes=


  -o mynetworks=127.0.0.0/8


  -o smtpd_error_sleep_time=0


  -o smtpd_soft_error_limit=1001


  -o smtpd_hard_error_limit=1000


  -o smtpd_client_connection_count_limit=0


  -o smtpd_client_connection_rate_limit=0


  -o receive_override_options=no_header_body_checks,no_unknown_recipient_checks,no_milters,no_address_mappings


  -o local_header_rewrite_clients=


  -o smtpd_milters=


  -o local_recipient_maps=


  -o relay_recipient_maps=
That should be all the modifications we need to make to master.cf so lets add a couple lines to main.cf. This line just tells Postfix that there is a content filter available (amavis) and where to find it.
nano /etc/postfix/main.cf
Add the following to the end of “/etc/postfix/main.cf”:
# Filtering With amavis:


content_filter = amavisfeed:[127.0.0.1]:10024
Now Postfix is configured to use Amavis, so we should be ready to start the filtering daemons:
systemctl start spamassassin


systemctl start amavisd
Then configure them to start at boot time:
systemctl enable spamassassin


systemctl enable amavisd
And finally, restart Postfix:
systemctl restart postfix
Now if you take a look at “/var/log/maillog” you should see a bunch of “Found decoder” messages for amavis, then a “Found secondary av scanner ClamAV-clamscan” then the usual stopping and starting Postfix logs. Your system should be set to scan emails now, lets test it.
Testing
During testing, I like to use telnet, so lets install that now:
yum install telnet -y
Verify SMTP:
Now lets first verify that Amavis is listening for connections:
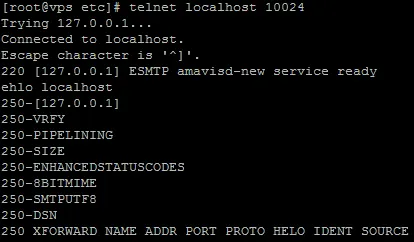
telnet localhost 10024
You should see a line saying “220 [127.0.0.1] ESMTP amavisd-new service ready”, respond with:
ehlo localhost
It should respond with a bunch of lines starting with “250-” if you get these, Amavis should be working.
You can disconnect with:
quit
Now lets do the same thing on port 10025 to make sure Postifix can accept the mail after Amavis is done scanning it:
telnet localhost 10025


ehlo localhost
You should get a bunch of “250-” lines again. If you got the lines, Postfix is configured to receive from Amavis.
Test the Filters
We know that both Amavis and Postifx are able to talk to each other, now we have to see if they communicate like they are supposed to. For this we will use mailx again, the strings we are going to be sending are safe strings that are configured in SpamAssassin and ClamAV for testing to verify the filters are working. Use the “mail” command to send yourself an email containing the test string:
mail [email protected]
Set whatever subject you want, and include the following in the body:
X5O!P%@AP[4\PZX54(P^)7CC)7}$EICAR-STANDARD-ANTIVIRUS-TEST-FILE!$H+H*
Then use CTRL+D to send it. If you check “/var/log/maillog” you should see a line similar to: “Blocked INFECTED” this means ClamAV is working. Lets test SpamAssassin now, send yourself another email, only this don’t use the string above, use this one:
XJS*C4JDBQADN1.NSBN3*2IDNEN*GTUBE-STANDARD-ANTI-UBE-TEST-EMAIL*C.34X
This time you should see a line similar to: “Blocked SPAM” that means SpamAssassin is working. If both of these tests were successful, you should now have Anti-Virus and Anti-Spam protection for your server. We should make sure the definitions stay up to date though.
Automatic Updates
Viruses and Spam are changing constantly, so we need to make sure that our server’s filters always have the latest definitions so they can effectively fight unwanted emails.
SpamAssassin
SpamAssassin automatically includes a cron job, so we just need to verify that it is configured to run. To do that we just need to check a file to make sure the line isn’t commented out:
cat /etc/cron.d/sa-update
Just make sure there isn’t a ‘#’ in front of this line:
10 4 * * * root /usr/share/spamassassin/sa-update.cron 2>&1 | tee -a /var/log/sa-update.log
ClamAV
There is another package for updating ClamAV, lets install it now:
yum install -y clamav-update
Configuring automatic updates for ClamAV is slightly more involved than SpamAssassin, now that the package is installed, open the “freshclam” configuration file:
nano /etc/freshclam.conf
Comment out “Example”, the first few lines should look something like this:
##


## Example config file for freshclam


## Please read the freshclam.conf(5) manual before editing this file.


##


# Comment or remove the line below.


#Example
Don’t modify the rest of the file, save and close it. Now you can do a manual update by running:
freshclam
The clamav-update package already created a cron job, but to make it work we need to modify another file:
nano /etc/sysconfig/freshclam
Remove these 4 lines:
### !!!!! REMOVE ME !!!!!!


### REMOVE ME: By default, the freshclam update is disabled to avoid


### REMOVE ME: network access without prior activation


FRESHCLAM_DELAY=disabled-warn   # REMOVE ME
Hint: With nano you can use CTRL+K to cut out an entire line of text.
Check Cron
Make sure cron is running using:
systemctl status crond
If it isn’t start it with:
systemctl start crond
Check that it is enabled at start:
systemctl list-unit-files | grep cron
Make sure it is “enabled”, if not you can enable it using:
systemctl enable cron
That’s it! Your mailserver should automatically update it’s Spam and Virus definitions.
Conclusion
In this section we covered the installation of mail filters. There will still be another section at the end of the series on configuring blacklists sender verification. For now there is enough Spam and Virus protection that we can move on to setting up a way to get the email off the server. Up until this point our mailserver can send and receive email, but we don’t have any way to download and read that email. This is where Dovecot comes in. Dovecot provides IMAP and POP3 capabilities to our server. In the next section we will cover installing Dovecot and configuring it to use our PostgreSQL database we setup in Part 3 for authentication.
If you have missed any of the previous Sections, you can use the links below to go back to them:
Part 1: Preparing the Server and Certificates
Part 2: Installing Postfix
Part 3: Installing PostgreSQL
Part 4: Installing ViMbAdmin