


You must be logged into post a comment.
Devin's Tech Blog
A technology blog with How-To and Informational posts.
Mailserver: Postfix Configuration – Part 2
This is Part 2 of the Postfix Mailserver Configuration series, if you missed Part 1 you can read it here.
Postfix Version Info
By default CentOS 7 comes with Postfix, but the version it comes with only supports MySQL and not PostgreSQL. I am going to be using PostgreSQL because with the new versions it is comparable to MySQL when it comes to performance, and it is true open-source. MySQL is owned by Oracle and a paid version is available PostgreSQL is totally free. If you want to compare the versions there is a good article here. Back to Postfix though, the version we need is NOT part of the centos-base package. To get the correct version we need to enable the centosplus repository.
To verify that you don’t already have the version of Postfix that includes PostgreSQL support run the following command:
postconf -c /etc/postfix -m | grep sql
With the default install of Postfix you should see something like this:
[root@vps ~]# postconf -c /etc/postfix -m | grep sql
mysql
[root@vps ~]#
Enable the Repository
The centosplus repo is actually already installed with CentOS 7, it just isn’t enabled. To activate it we need to edit “/etc/yum.repos.d/CentOS-Base.repo”
nano /etc/yum.repos.d/CentOS-Base.repo
Find the “base” section, it should be listed first in the file. You need to add “priority=1” and exclude=postfix* to this section. It should look something like this:
[base]
name=CentOS-$releasever - Base
#mirrorlist=http://mirrorlist.centos.org/?release=$releasever&arch=$basearch&repo=os
baseurl=http://centos.mirrors.ovh.net/ftp.centos.org/$releasever/os/$basearch/
gpgcheck=1
priority=1
exclude=postfix*
gpgkey=file:///etc/pki/rpm-gpg/RPM-GPG-KEY-CentOS-7
Now we need to enable the centosplus repository and set it’s priority to “2” so that the only packages pulled from it are the ones that are excluded in the higher priority repos. Scroll down until you find the centosplus section and change “enabled=1” and add “priority=2”, it should look something like this when you are finished:
#additional packages that extend functionality of existing packages
[centosplus]
name=CentOS-$releasever - Plus
#mirrorlist=http://mirrorlist.centos.org/?release=$releasever&arch=$basearch&repo=centosplus
baseurl=http://centos.mirrors.ovh.net/ftp.centos.org/$releasever/centosplus/$basearch/
gpgcheck=1
enabled=1
priority=2
gpgkey=file:///etc/pki/rpm-gpg/RPM-GPG-KEY-CentOS-7
(Re)Install Postfix
Before we install the new version of Postfix, we have to remove the old one:
yum remove postfix -y
Not always necessary, but its a good idea to clean the repos after changing things:
yum clean all
Now it is time to install the correct version of Postfix with PostgreSQL support: (As of this writing version 2.10 should be installed with this command)
yum install postfix
You can verify that you have the correct version by running the “postconf -c /etc/postfix -m | grep sql” command from earlier, now your output should look like this:
[root@vps ~]# postconf -c /etc/postfix -m | grep sql
mysql
pgsql
[root@vps ~]#
Configure Postfix
With the correct version of Postfix installed, we can start configuration. There are two configuration files that we are going to be using a lot throughout the rest of this guide. These files are “/etc/postfix/master.cf” and “/etc/postfix/main.cf“.
master.cf
The first file we are going to start modifying will be the master.cf file you can open it using:
nano /etc/postfix/master.cf
Uncomment the “submission” line and all the overwrites you find under it. Or you can erase them and replace the submission line and the lines below it with the example below. The overwrites start with a few spaces and the character -o. These lines are used to overwrite configuration variables that can be set in the main.cf file. But be careful uncommenting these lines: don’t erase the spaces in front, otherwise Postfix won’t recognize them as additions to the Submission line.
Here is an example of what it should look like:
submission inet n - n - - smtpd
 -o syslog_name=postfix/sumbission
 -o smtpd_tls_wrappermode=no
 -o smtpd_tls_security_level=encrypt
 -o smtpd_sasl_auth_enable=yes
# -o smtpd_sasl_type=dovecot
# -o smtpd_sasl_path=private/auth
 -o mynetworks=127.0.0.0/8
 -o smtpd_relay_restrictions=permit_mynetworks,permit_sasl_authenticated,defer_unauth_destination
 -o milter_macro_daemon_name=ORIGINATING
I have commented out two lines in the above example, because we will be adding them later, but I didn’t want to completely remove the from the config.
The “submission” here is port 587 for sending email, and the smtp above it is port 25, we are mainly just using port 25 for receiving emails for users on this server, all smtp mail will be sent out using port 587 on the server.
Pay attention to this line:
-o smtpd_relay_restrictions=permit_mynetworks,permit_sasl_authenticated,defer_unauth_destination
This sets the server to relay mail from “mynetworks” defined above it to send email, as well as authenticated users, and then reject all other attempts to relay messages. The “defer_unauth_destination” is important to keep your server from becoming a spam relay. Note: This line was called “smtpd_recipient_restrictions” in previous versions of postfix, and used “reject” instead of “defer_unauth_destination” this change was made in version 2.10 of Postfix. You will need to adjust your configuration accordingly if you use an older version.
These should be all the modification we need to make in master.cf go ahead and save and close it.
main.cf
It’s time to modify the other configuration file: main.cf open it using nano or the editor of your choice:
nano /etc/postfix/main.cf
Find the “hostname” line and modify it to match the hostname of your mailserver set in the previous post.
myhostname = hostname.domain.com
You may also want to set your domain, however it can be determined automatically:
mydomain = domain.com
Set your origin: (this is just the default email origin setting for when no @domain is provided, so I’m going to use the string from the previous setting)
myorigin = $mydomain
That completes the modifications to the main.cf file, save and close it. You should be able to test your mailserver now.
Restart the service
First you need to restart Postfix to apply the changes made in the previous steps.
systemctl restart postfix
You can verify that it started successfully using
systemctl status postfix
The status should read “active” as in the image below:
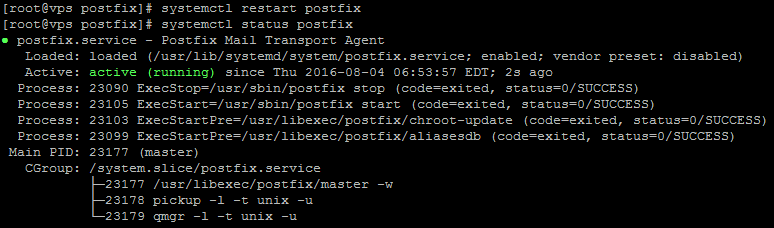
If your system doesn’t read “active” or fails to restart it can be useful to check “/var/log/maillog” for any errors. When working with mailservers, I tend to have a second terminal session open to the host for the sole purpose of “tailing the logfile”. Use this command in a second terminal to keep an eye on the logfile:
tail -fn 200 /var/log/maillog
Testing
In order to test the mailserver’s ability to send email, I generally use the simple text-based client: mailx. It probably wont be installed on your system already, so use this command to install it:
yum install mailx
Now you should be able to use the “mail” command to send an email.
mail youremail@somedomain.com
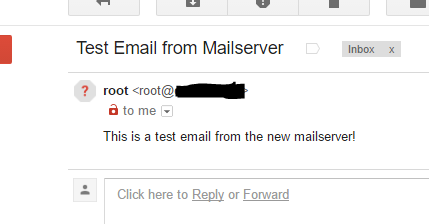
Type a subject, and hit Enter, you will be taken to a new line where you can type the Body. After you type the body of your message, CTRL+D will send the email.

As long as your ISP allows outbound traffic on port 25, you should see an email in your inbox shortly.
If you didn’t receive the email, check your mail log and make sure you see the message go through your mailserver. There should be a line reading “status=sent”, and you should see where it gets removed from the queue.
Certificates
Remember those certificates we generated and got signed in the previous section? Now it is time to put them to use. To configure Postfix to use the certificates we first need to put them somewhere it can access them. Make a directory to hold the certificates in “/etc/postfix” called certs:
mkdir /etc/postfix/certs
Get the certificates where they belong
Now we have to move the appropriate certificates to the new folder. You should have uploaded the .zip file from StartSSL to “/root/certs” in the previous section, we are going to need to extract that:
cd /root/certs
unzip hostname.domain.com.zip
upzip OtherServer.zip
This will give you 3 new files: 1_Intermediate.crt, 2_hostname.domain.com.crt, and root.crt, and you should have the old hostname.domain.com.key file created in the previous section. These files all need to be copied to the directory we created in the previous step. (Be sure to change the hostname.domain.com to fit your environment)
cp 1_Intermediate.crt /etc/postfix/certs/hostname.domain.com.ca.crt
cp 2_mail.domain.com.crt /etc/postfix/certs/hostname.domain.com.crt
cp root.crt /etc/postfix/certs/ca.crt
cp hostname.domain.com.key /etc/postfix/certs/hostname.domain.com.key
Everything should be in place now so we can tell Postfix to use the certificates.
Configure Postfix to use the certificates
To configure Postfix to use the certificates we need to define them in the main.cf file.
nano /etc/postfix/main.cf
Add the following to the end, making the appropriate name changes to fit your environment:
# Locations of TLS Certificate and Key Files
smtpd_tls_cert_file = /etc/postfix/certs/hostname.domain.com.crt
smtpd_tls_key_file = /etc/postfix/certs/hostname.domain.com.key
smtpd_tls_CAfile = /etc/postfix/certs/ca.crt
Now Postfix is configured to use the certificates, but needs to be restarted to apply the changes:
systemctl restart postfix
Conclusion
Now you should have a functional Postfix mailserver with valid certificates that you can use to send email. You won’t be able to send email from anywhere other than the the host itself yet because the firewall is probably configured to block incoming traffic on ports 25 and 587, but we’re not quite ready to enable that ability yet. In the next section we will install and configure PostgreSQL to manage users and domains. PostgreSQL will provide a location to store all the information so that the different parts of the mailserver can interact with one another. Since PostgreSQL is going to hold all the user and password information we need to make sure access to the database is restricted, and that the passwords are encrypted when they are stored. All this will be covered during PostgreSQL installation in Part 3.
If you missed Part 1 of the Mailserver series, you can view it here.