Devin's Tech Blog
A technology blog with How-To and Informational posts.

Mailserver: Roundcube Configuration – Part 7
Welcome to Part 7 of the Mailserver Configuration series. At this point if you have been following the series you should already have a fully functional mailserver. No email provider is complete though without a web-based email service. We are going to fill that gap in our mailserver with Roundcube.
Get the files in place
Roundcube can be installed from the EPEL repository, but that is version 1.1 (long term support) and they didn’t implement PHP 7 support until beta 1.2. Now version 1.2 is released, so we are going to have to download the source for the latest version. You can obtain the complete version from the website or by using wget:
wget https://github.com/roundcube/roundcubemail/releases/download/1.2.1/roundcubemail-1.2.1-complete.tar.gz
Extract the archive:
tar -xvzf roundcubemail-*
Copy the files to the installation folder:
cp -R roundcubemail-* /usr/share/roundcubemail/
Configure the Database
By default Roundcube uses MySQL for it’s database, but since we already have PostgreSQL installed we can just reconfigure Roundcube to use PostgreSQL instead. First change to the roundcube install directory, then switch to your postgres superuser account:
cd /usr/share/roundcubemail/

su postgres
Now we need to create a PostgreSQL user for Roundcube, the system will ask you for a password for the new user that you will need to enter twice. Next the system will prompt for another password this is the password for your postgres superuser account. To create the user run:
createuser -P roundcube
Next we create the database with the owner as our new user, it will prompt for your postgres superuser account password again:
createdb -O roundcube -E UNICODE roundcubemail
Finally do the initial population of the database, this will ask for your roundcube user password:
psql -U roundcube -f SQL/postgres.initial.sql roundcubemail
We are done running commands as the postgres user so exit back to the root command prompt:
exit
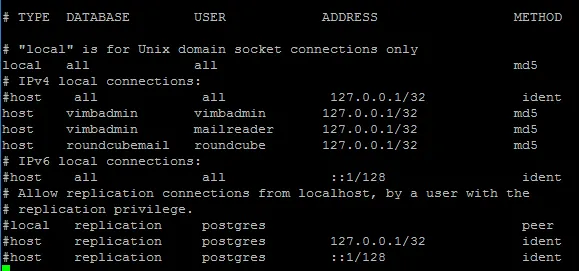
We still need to give this user permissions to connect to the database open pg_hba.conf and scroll to the bottom:
nano /var/lib/pgsql/data/pg_hba.conf
Add the following line below the lines we added previously:
host roundcubemail roundcube 127.0.0.1/32 md5
Your file should look like this now:
Apply the settings by restarting PostgreSQL
systemctl restart postgresql
SSL Configuration
Technically at this point if you opened port 80 in your firewall, you could navigate to “http://mail.domain.com/installer/” but were going for security here remember? Navigating to that site right now would leave our connection unencrypted and open for someone to listen in on the connection and watch the entire configuration process, not good. So lets configure SSL encryption, again using the certificates we already have.
httpd config
The first thing we need to do is createthe httpd configuration file:
nano /etc/httpd/conf.d/roundcubemail.conf
You MUST change both (there are 2) of the “put.your.ip.here” lines under “# Apache 2.4” to your IP address, obviously the IP is going to be different for everyone, but this is the IP you want to configure Roundcube from. This will be changed later when we know everything is configured and secure.
#

# Round Cube Webmail is a browser-based multilingual IMAP client

#


Alias /roundcubemail /usr/share/roundcubemail


# Define who can access the Webmail

# You can enlarge permissions once configured


<Directory /usr/share/roundcubemail/>

 <IfModule mod_authz_core.c>

 # Apache 2.4

 Require ip put.your.ip.here

 </IfModule>

 <IfModule !mod_authz_core.c>

 # Apache 2.2

 Order Deny,Allow

 Deny from all

 Allow from 127.0.0.1

 Allow from ::1

 </IfModule>

</Directory>


# Define who can access the installer

# keep this secured once configured


<Directory /usr/share/roundcubemail/installer/>

 <IfModule mod_authz_core.c>

 # Apache 2.4

 Require ip put.your.ip.here

 </IfModule>

 <IfModule !mod_authz_core.c>

 # Apache 2.2

 Order Deny,Allow

 Deny from all

 Allow from 127.0.0.1

 Allow from ::1

 </IfModule>

</Directory>


# Those directories should not be viewed by Web clients.

<Directory /usr/share/roundcubemail/bin/>

 Order Allow,Deny

 Deny from all

</Directory>

<Directory /usr/share/roundcubemail/plugins/enigma/home/>

 Order Allow,Deny

 Deny from all

</Directory>
SSL Certificates
Now we need to configure SSL access, update the paths to your certificates, and paste the following lines into the end of the file:
#Virtual Host Configuration

NameVirtualHost *:443

<VirtualHost *:443>

ServerName mail.domain.com:443

DocumentRoot /usr/share/roundcubemail

SSLEngine on

SSLProtocol all -SSLv2

SSLCipherSuite ALL:!ADH:!EXPORT:!SSLv2:RC4+RSA:+HIGH:+MEDIUM

SSLCertificateFile /etc/postfix/certs/mail.domain.com.crt

SSLCertificateKeyFile /etc/postfix/certs/mail.domain.com.key

SSLCertificateChainFile /etc/postfix/certs/mail.domain.com.crt

SSLCACertificateFile /etc/postfix/certs/ca.crt

</VirtualHost>
Go ahead and save and close that file. The default SSL configuration is only going to cause us problems, so I usually just rename it and re-create a very basic one telling the system to listen to https on port 443. Rather than walk you through the process, I’m just going to give you a single command to do it all at once.
cd /etc/httpd/conf.d/ && mv ssl.conf ssl.conf.bak && echo "Listen 443 https" > ssl.conf
This command just changes to the Apache config directory, moves the default ssl config to a .bak file, then creates a new ssl.conf that only contains the settings we need.
Now we need to make one change in php.ini:
nano /etc/php.ini
Find “;date.timezone =” uncomment this line by removing the ‘;’ and set your timezone, I am on Eastern Time, so I will be using “America/New_York” you can find a list of possible options on the php website. (Remember, no spaces allowed in the timezone name)
date.timezone = America/New_York
Here is a basic list of options:
Eastern ........... America/New_York

Central ........... America/Chicago

Mountain .......... America/Denver

Mountain no DST ... America/Phoenix

Pacific ........... America/Los_Angeles

Alaska ............ America/Anchorage

Hawaii ............ America/Adak

Hawaii no DST ..... Pacific/Honolulu
That should be all we need to do, now restart Apache:
systemctl restart httpd
Firewall Modification
Now you should open port 443 in your firewall, if you want an added layer of security, you could restrict it to the IP you are managing the server from. We set restrictions on the directories already so this isn’t totally necessary. This part may differ a bit because I use iptables instead of firewalld:
nano /etc/sysconfig/iptables
Add the following lines:
# Roundcube Webmail Access:

-A INPUT -m state --state NEW -m tcp -p tcp --dport 443 -j ACCEPT
Then restart iptables:
systemctl restart iptables
Installing Roundcube
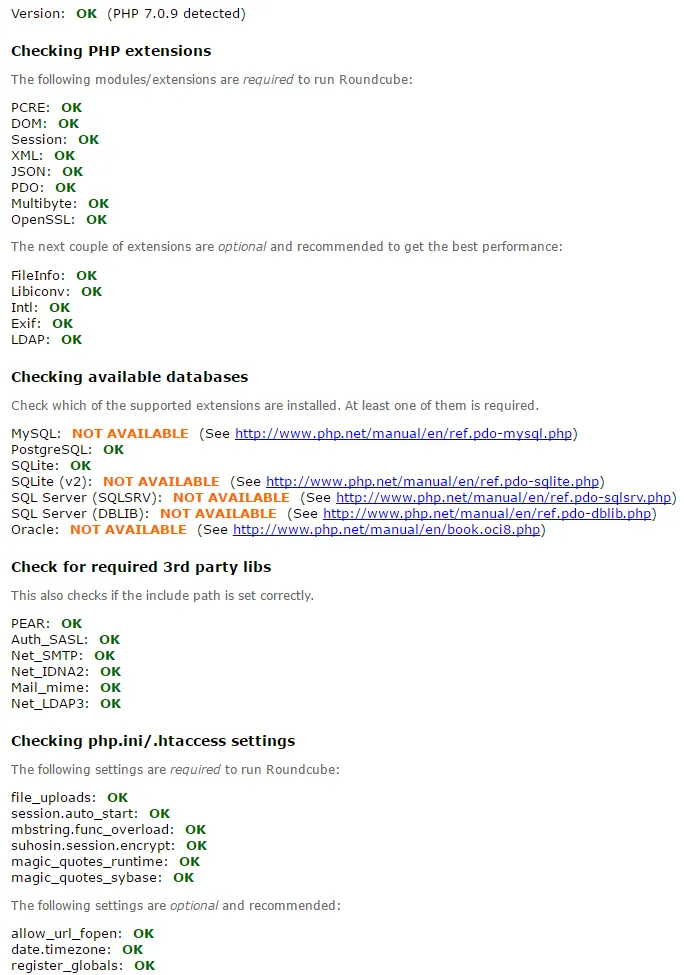
Start the web-based installer at: https://mail.domain.com/installer/
You should have an install page open on your server now. Take a minute to make sure that everything shows “OK” except the list of databases, the only database you need to make sure is “OK” is the PostgreSQL database. Here is an example of how mine looks:
Troubleshooting
If you have trouble with dependencies, one fix that I found works a lot of times is to install it from the EPEL repository with “yum install roundcubemail” then remove it with “yum remove roundcubemail” then you will need to re-copy the install files to /usr/share/roundcubemail and also rename /etc/httpd/conf.d/roundcubemail.conf.rpmsave by removing the .rpmsave from the end.
Setup
Click the “next” button and on the following page, you can specifiy what you want for product_name and I usually use https://domain.com/roundcubesupport.html for the support page, you can create this page later.
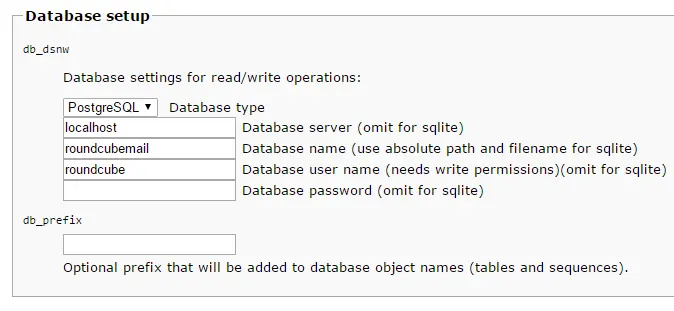
From there I generally accept the defaults until I get to Database setup here it should have auto-detcted PostgreSQL, and auto-populated the first fields. You should only need to input the password for the roundcube PostgreSQL user we created earlier in this guide.
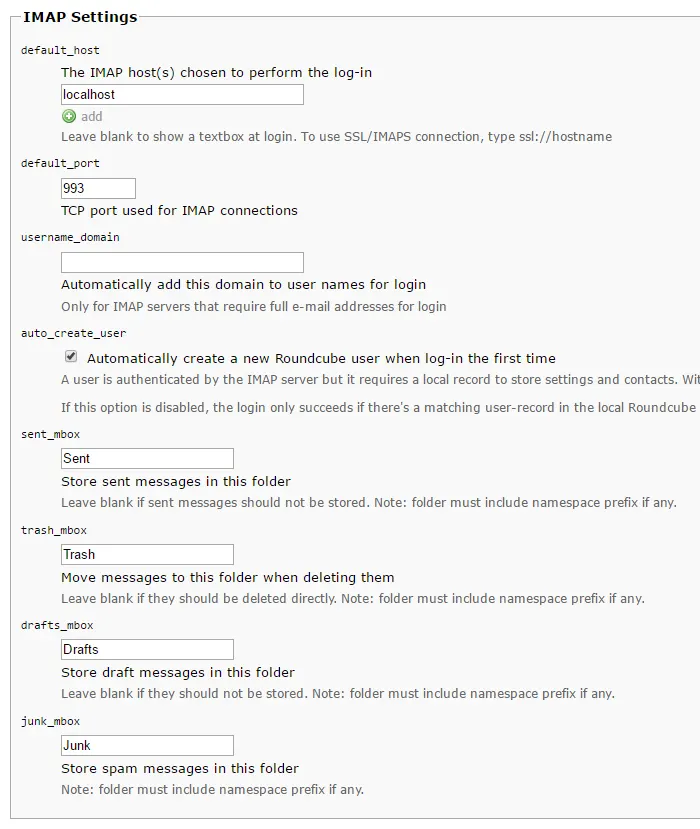
On to the IMAP settings, here we can use “localhost” for the IMAP server, but I change the port to port 993 so that traffic is encrypted. I leave the username_domain blank because we want this server to be available to multiple domains. Make sure the “auto_create_user” box is checked, this makes Roundcube create any user automatically in it’s own database when it successfully authenticates to the IMAP server. The rest of the default IMAP settings should be fine.
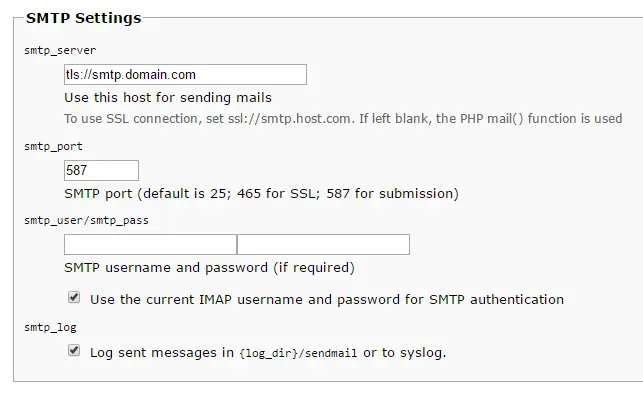
In the SMTP section, you need to set this to use Postfix on your mailserver, you can do that by setting this to: tls://smtp.domain.com set the port to “587” and make sure the box is checked for “Use the current IMAP username and password for AMTP authentication”
The Display settings & user prefs section is up to you to decide, I usually set the language to “en_US” and leave the rest at default. Moving on to the Plugins section, again this is usually your own preferences, but here are the ones I usually enable: attachment_reminder, emoticons, filesystem_attachments, newmail_notifier, password, vcard_attachments, zipdownload. When you are done, click “CREATE CONFIG”.
Create the Config File
You need to make the configuration file, to do this go back to your terminal and run:
nano /usr/share/roundcubemail/config/config.inc.php
Back on the web page, you will have an option to download the config, I usually just click in the box that displays the config and do CTRL+A to select it all and then I copy and paste it into the file we created using the terminal. Below the config file, there will be a list of the settings we just defined so you can go back and change them if you want to. Don’t close this file yet.
Plugin Settings
Go to the end of the config.inc.php file and find the line that starts with:
$config['plugins'] = array(
This is what my line looks like:
$config['plugins'] = array('attachment_reminder', 'emoticons', 'filesystem_attachments', 'newmail_notifier', 'password', 'vcard_attachments', 'zipdownload');
I plan on getting the password plugin working with PostgreSQL at some point, but for right now if you would like to simply disable it, add the following line: (make sure you update the URL)
$config['password_disabled'] = "I can't get this plugin to cooperate with PostgreSQL at this time. Use <a href=https://mail.domain.com:7025/auth/change-password>ViMbAdmin</a> instead.";
Remember this means that you are probably going to have to open Port 7025 to everyone in your firewall if you want users to be able to change their own password.
Secure Roundcube
That should complete the installation, now lets secure the installation a bit. First get rid of the “installer” folder:
mv /usr/share/roundcubemail/installer /root/
Then open the Apache Configuration file and comment out the first “Require ip ” line and add “Require all granted” as in this example:
<Directory /usr/share/roundcubemail/>

 <IfModule mod_authz_core.c>

 # Apache 2.4

 # Require ip your.ip.address.here

 Require all granted

 </IfModule>
Restart Apache, if you only opened the ports in your firewall to a specific IP space, open it to everywhere now.
Conclusion
Now you should have a fully functional mailserver. I am still going to add another part to this series for configuring blacklists and source checking to help fight spam, but right now you could start using your mailserver. Go ahead and add your domain with ViMbAdmin, and create a few mailboxes. Then test by logging into Roundcube. Your mailserver will also work to send and receive emails from mail clients as well.
I did run into a few minor problems while configuring Roundcube and Dovecot, but I went back and fixed the appropriate parts of the series so that it should go smooth for you. I do eventually want to get the password plugin for Roundcube working and possibly add some other plugins. Another thing you will probably want to do is configure virtual hosts in Apache so you can host a web page on the server as well. If you found any errors on any of the parts, especially this one for Roundcube, please leave a comment so I can go back and fix them.
If you missed any part of the series, you can select it from the Index below:
Part 1: Preparing the Server and Certificates
Part 2: Installing Postfix
Part 3: Installing PostgreSQL
Part 4: Installing ViMbAdmin
Part 5: Mail Filters
Part 6: Dovecot


You must be logged into post a comment.
April 11th, 2018
essay for me http://dekrtyuijg.com/
Excellent advice. Kudos!