


You must be logged into post a comment.
Devin's Tech Blog
A technology blog with How-To and Informational posts.

Mailserver: ViMbAdmin Configuration – Part 4
Welcome to Part 4 of the Mailserver setup guide. In this part we are going to be installing and configuring ViMbAdmin (vim-be-admin) to manage users and mailboxes, as well as the domains our mailserver will service. You can find more information about ViMbAdmin on their website here. If you missed the previous parts you can find them here: Part 1 – Server Configuration, Part 2 – Postfix Configuration, Part 3 – PostgreSQL Configuration.
Preparation
Before installing ViMbAdmin we need to install some PHP stuff. First of all I’m going to be using PHP version 7. We are using the latest version of CentOS and Postfix, we might as well go with the latest PHP. I have written a guide here for installing PHP 7 on your server. Make sure you install the php70w-pgsql package. You will also need mcrypt, composer and git:
yum install httpd mod_ssl php70w-mcrypt composer git
Then set the install path:
export INSTALL_PATH=/usr/share/vimbadmin
ViMbAdmin Installation
Use Git to clone the installation and composer to install:
git clone https://github.com/opensolutions/ViMbAdmin.git $INSTALL_PATH


cd $INSTALL_PATH


composer install --dev
Set permissions so Apache can serve the web interface:
chown -R apache:apache var/
Database Configuration
ViMbAdmin comes with a default configuration file that can be copied for a basic configuration, we will copy that file to the appropriate name now keeping the original as a backup:
cp $INSTALL_PATH/application/configs/application.ini.dist $INSTALL_PATH/application/configs/application.ini
Then edit the new file:
nano $INSTALL_PATH/application/configs/application.ini
We need to change the Database connection properties so that ViMbAdmin will use our PostgreSQL database instead of MySQL. Make the settings in your file look like the ones below, substituting yourpasswordhere for the password you created in the previous section:
resources.doctrine2.connection.options.driver = 'pdo_pgsql'


 resources.doctrine2.connection.options.dbname = 'vimbadmin'


 resources.doctrine2.connection.options.user = 'vimbadmin'


 resources.doctrine2.connection.options.password = 'yourpasswordhere'


 resources.doctrine2.connection.options.host = 'localhost'


 resources.doctrine2.connection.options.charset = 'utf8'
Now find the Mailboxes section and modify it to match the following example:
;;;;;;;;;;;;;;;;;;;;;;;;;;;;;;;;;;;;;;;;;;;;;;;;;;;;;;;;;;;;;;;;;;;;;;;;;;;;


; Default values for creating mailboxes


; This sets the uid and gid columns in the mailbox table to the below values


defaults.mailbox.uid = 200


defaults.mailbox.gid = 12
Finally just below that section find the following settings and modify them to match his example:
defaults.mailbox.maildir = "%d/%u/"


defaults.mailbox.homedir = "/home/mail/"
The next thing we have to do is set access to the .htaccess permissions:
cp $INSTALL_PATH/public/.htaccess.dist $INSTALL_PATH/public/.htaccess
Create the Database
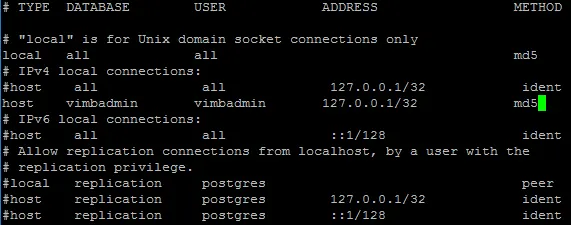
The first thing we have to do is allow the administrator user we created in the previous section to connect to the database, we do that by editing “/var/lib/pgsql/data/pg_hba.conf”:
nano /var/lib/pgsql/data/pg_hba.conf
Scroll to the bottom and add the following line under “# IPv4 local connections:”
host vimbadmin vimbadmin 127.0.0.1/32 md5
It should look like this:
After making these changes, restart PostgreSQL:
systemctl restart postgresql
Now change back to your install directory if your not already there:
cd $INSTALL_PATH
Run this command to create the database:
./bin/doctrine2-cli.php orm:schema-tool:create
If it was successful it should look like this:

Webserver Configuration
ViMbAdmin is installed, now we need to tell Apache to serve the files. For security reasons, I like to move the management page off the standard HTTP and HTTPS ports. We are still going to be using HTTPS to host the page but lets put it on port 7025. Earlier I had you install Apache, and mod_ssl (for serving HTTPS pages) so lets configure those.
Configuring Apache
All the Apache configuration files are stored in “/etc/httpd/” the HTTPS configuration is stored at “/etc/httpd/conf.d/ssl.conf” but we are going to be working with port 7025, so lets make a new configuration file:
nano /etc/httpd/conf.d/vimbadmin.conf
Configure Apache to listen on our new port and setup the new Virtual Host. Copy and past the following into the new file you just opened: Be sure to modify the ServerName and the certificate names. Notice we are re-using the same certificates we used for Postfix, if you need to look up these names you can find them in “/etc/postfix/certs”.
Listen 7025


NameVirtualHost *:7025


<VirtualHost *:7025>


ServerName mailserv.domain.com:7025


DocumentRoot /usr/share/vimbadmin/public


SSLEngine on


SSLProtocol all -SSLv2


SSLCipherSuite ALL:!ADH:!EXPORT:!SSLv2:RC4+RSA:+HIGH:+MEDIUM


SSLCertificateFile /etc/postfix/certs/mail.domain.com.crt


SSLCertificateKeyFile /etc/postfix/certs/mail.domain.com.key


SSLCertificateChainFile /etc/postfix/certs/mail.domain.com.crt


SSLCACertificateFile /etc/postfix/certs/mail.domain.com.ca.crt


Alias /vimbadmin /usr/share/vimbadmin/public


<Directory /usr/share/vimbadmin/public>


 Options FollowSymLinks


 AllowOverride FileInfo


 # For Apache >= 2.4


 Require all granted


</Directory>


</VirtualHost>
Now we can restart Apache, configure it to start on boot, and it should be serving ViMbAdmin. (You won’t be able to access it yet without opening the port in your firewall.)
systemctl restart httpd


systemctl enable httpd
The firewall portion of this guide might differ a bit from your server. I always replace the new firewalld service in CentOS 7 with standard iptables so the firewall behaves in the same way as CentOS 6 because that is what I’m used to. Here is a quick run-down on how to do that before I give you the rule you need to add to open port 7025:
Side-Note: Replace CentOS 7 “firewalld” with “iptables”
I’m much more comfortable with iptables than with the new firewalld service. So here is a quick HowTo for replacing firewalld with iptables:
yum remove firewalld


yum install iptables-services


systemctl restart iptables


systemctl restart ip6tables


systemctl enable iptables


systemctl enable ip6tables
Now you can modify “/etc/sysconfig/iptables” and “/etc/sysconfig/ip6tables” appropriately for your server configuration. (I will eventually do a more detailed post about iptables.)
Firewall Rules
I like to restrict access to port 7025 to specific IP spaces that I will be managing the mailserver from to harden security a bit more. Use the following rule to restrict access from a specific IP. You can add more than one of these lines for each IP that you might be managing the server from: Replace x.x.x.x with your IP address.
-A INPUT -m state --state NEW -m tcp -p tcp -s x.x.x.x --dport 7025 -j ACCEPT
Or if your not that worried about security, you can simply allow connections from anywhere to 7025:
-A INPUT -m state --state NEW -m tcp -p tcp --dport 7025 -j ACCEPT
Don’t forget to restart iptables:
systemctl restart iptables
Web Interface
Your ViMbAdmin interface should be visable now, to test you can access it at: https://mail.domain.com:7025/. It should look like the following page: If you don’t like your “Security Salts” just refresh the page and they get re-generated:
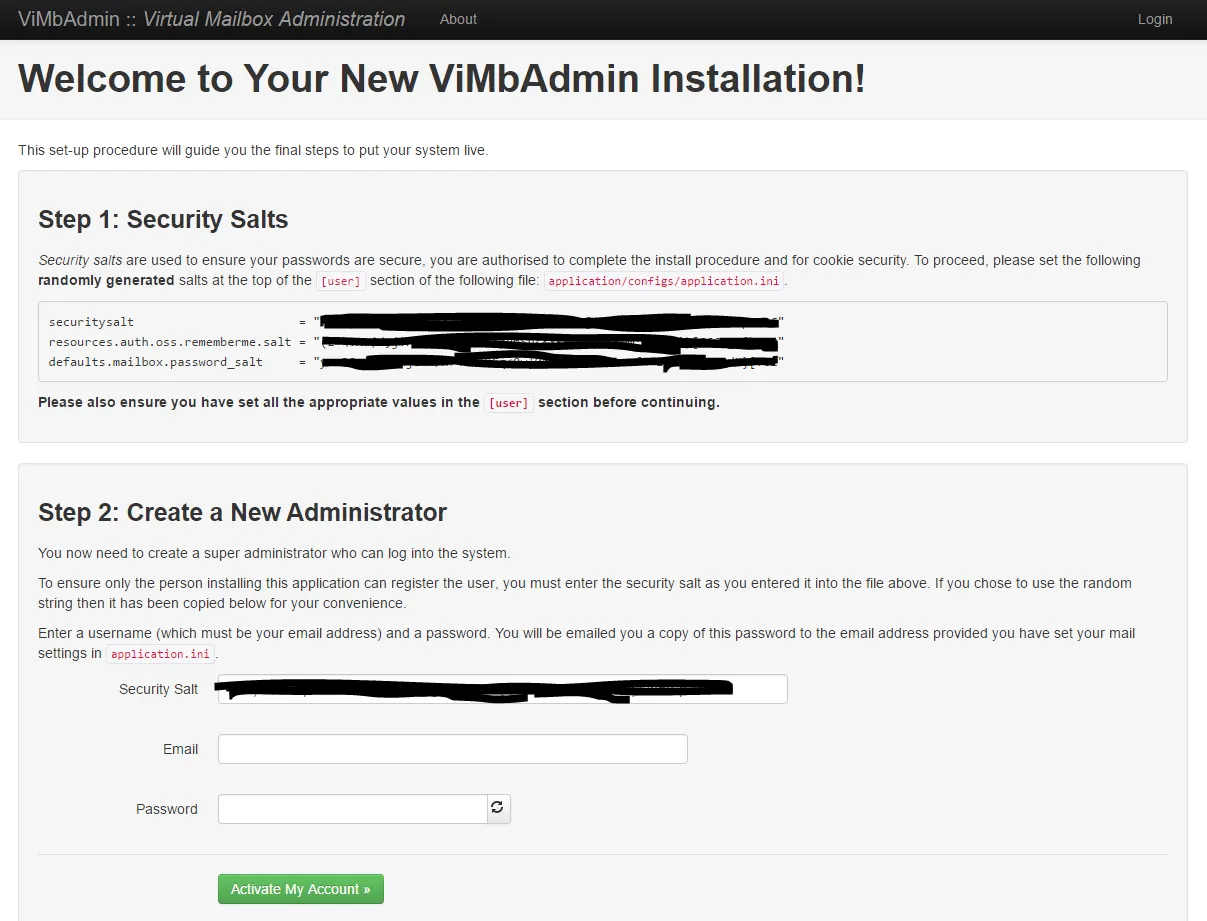
You need to update these keys in your “application.ini” file to continue:
nano $INSTALL_PATH/application/configs/application.ini
Find the following section:
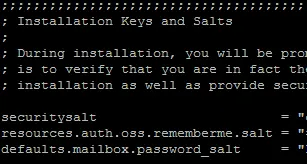
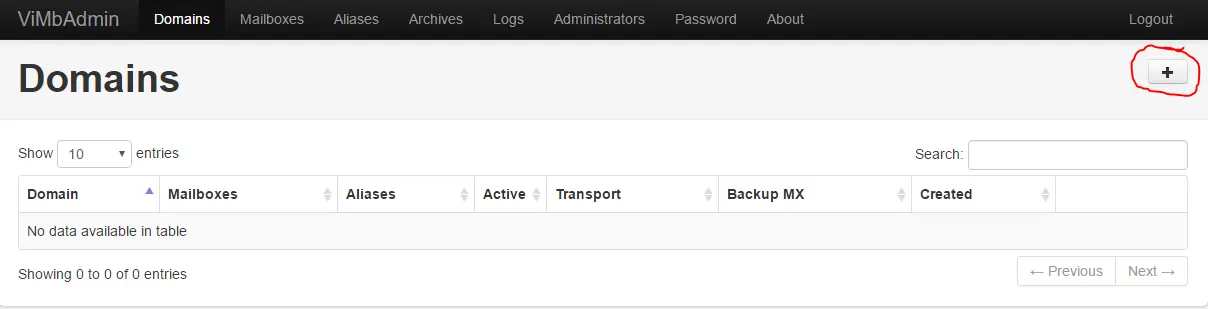
Update your keys accordingly, then move on to creating a Super Administrator user. The email address you use doesn’t necessarily have to be an active email address yet, just don’t loose the password you use to create the account. After creating the account you can login, and should see an empty list of domains configured on your server, you can click the “+” I circled in red on the image below to add a domain. Using ViMbAdmin shouldn’t be too hard to figure out after playing with it for awhile, one thing to remember is if you want to forward email, you need to use an Alias.
Postfix and PostgreSQL
While we have a way to manage the database now, it doesn’t do us much good if Postfix doesn’t look to the database for the mailbox configuration information. We need to configure Postfix to use PostgreSQL. To do that we are going to create some files telling Postfix how to read from the database.
PostgreSQL user for Postfix
First of all Postfix needs to do exactly that READ from the database not WRITE so to keep our mailserver secure, lets create a new PostgreSQL user for Postfix with READ-ONLY privileges. Go ahead and connect to PostgreSQL, don’t forget “sudo” because were doing this as another user: (You will need the secure password you created for the postgres user in the previous part)
sudo -u postgres pgsql
Connect to the vimbadmin database (we don’t want this to be a system-wide user)
\c vimbadmin
Finally create a user for Postfix, and assign it the required roles:
CREATE USER mailreader WITH PASSWORD 'yourpasswordhere';


GRANT CONNECT ON DATABASE vimbadmin TO mailreader;


GRANT SELECT ON ALL SEQUENCES IN SCHEMA public TO mailreader;


GRANT SELECT ON ALL TABLES IN SCHEMA public TO mailreader;


REVOKE CREATE ON SCHEMA public FROM mailreader
Remember all these commaneds happened after “\c vimbadmin” so “public” is actually only changing the “vimbadmin” database. Now we need to adjust “pg_hba.conf” again to allow logon for the new user:
nano /var/lib/pgsql/data/pg_hba.conf
Add the following line just below the one we added earlier:
host vimbadmin mailreader 127.0.0.1/32 md5
Then restart PostgreSQL:
systemctl restart postgresql
Postfix Mappings
Create a directory to hold the new mappings:
mkdir /etc/postfix/pgsql
For all of the next files we create, remember to replace “password” with your password for the mailreader user we just created.
Virtual Alias Mapping
Create the file:
nano /etc/postfix/pgsql/virtual_alias_maps.cf
Paste in the following:
user = mailreader


password = password


hosts = localhost


dbname = vimbadmin


query = SELECT goto FROM alias WHERE address = '%s' AND active = true
Virtual Domain Mapping
Create the file:
nano /etc/postfix/pgsql/virtual_domains_maps.cf
Paste in the following:
user = mailreader


password = password


hosts = localhost


dbname = vimbadmin


query = SELECT domain FROM domain WHERE domain='%s' and backupmx = false and active = true
Virtual Mailbox (user) Mapping
Create the file:
nano /etc/postfix/pgsql/virtual_mailbox_maps.cf
Paste in the following:
user = mailreader


password = password


hosts = localhost


dbname = vimbadmin


table = mailbox


select_field = maildir


where_field = username
Relay Domains
Create the file:
nano /etc/postfix/pgsql/relay_domains.cf
Paste in the following:
user = mailreader


password = password


hosts = localhost


dbname = vimbadmin


table = domain


select_field = domain


where_field = domain
Transport Maps
Create the file:
nano /etc/postfix/pgsql/transport_maps.cf
Paste in the following:
user=mailreader


password=password


dbname=vimbadmin


table=domain


select_field=transport


where_field=domain


hosts=localhost
Virtual Mailbox Limits
Create the file:
nano /etc/postfix/pgsql/virtual_mailbox_limits.cf
Paste in the following:
user = mailreader


password = password


hosts = localhost


dbname = vimbadmin


table = mailbox


select_field = quota


where_field = username
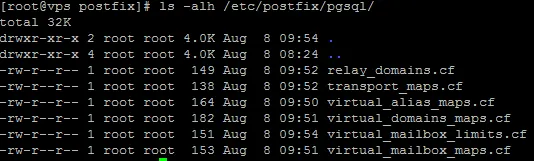
You should have 6 files in your “pgsql” directory if you run “ls -alh /etc/postfix/pgsql/” now:
Using the new files
Now we have created files telling Postfix how to get information out of the database we created with ViMbAdmin, we just need to tell Postfix to use them. To tell Postfix where the files are, we need to edit “main.cf” again.
nano /etc/postfix/main.cf
Add the following lines which tell Postfix what Unix user account to create mailboxes with to the end of main.cf:
# Set local user and permissions:


local_recipient_maps =


virtual_uid_maps = static:200


virtual_gid_maps = static:12
Finally, these lines tell Postfix where the files are that teach it how to use the database we just made using ViMbAdmin.
Add them to the end of main.cf as well:
# Postgresql Config information


virtual_alias_maps = pgsql:/etc/postfix/pgsql/virtual_alias_maps.cf


virtual_mailbox_domains = pgsql:/etc/postfix/pgsql/virtual_domains_maps.cf


virtual_mailbox_maps = pgsql:/etc/postfix/pgsql/virtual_mailbox_maps.cf


virtual_mailbox_base = /home/mail


virtual_mailbox_limit = 512000000


virtual_minimum_uid = 8


virtual_transport = virtual


local_transport = virtual


local_recipient_maps = $virtual_mailbox_maps


transport_maps = pgsql:/etc/postfix/pgsql/transport_maps.cf
To apply these changes, we need to restart Postfix:
systemctl restart postfix
Conclusion
We covered a lot of configuration in this section, but now Postfix should be using the PostgreSQL database for virtual domain and user mappings. We also configured a Web Interface (ViMbAdmin) to manage the database Postfix reads from. In the next section we will install Spam and Virus filters using SpamAssassin and ClamAV.
If you missed any of the previous parts, you can check them out using the links below:
Part 1: Preparing the Server and Certificates
Part 2: Installing Postfix
Part 3: Installing PostgreSQL
Or you can Continue to Part 5 where we configure mail filters.